LPJ-GUESS is a computer model that simulates how the structure and function of vegetation and ecosystems on land may be expected to respond to variation in environmental drivers like temperature, rainfall, sunlight and atmospheric concentrations of CO2.

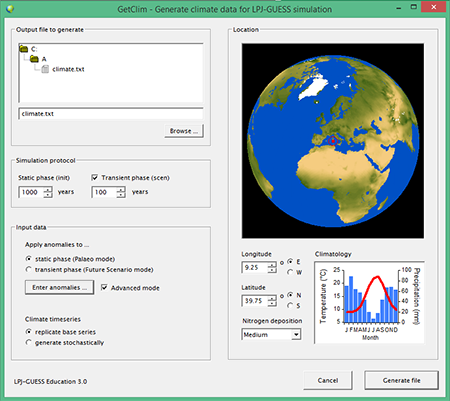
Input data to the model are read from an environmental driver file, which contains data on climate, CO2 concentrations, atmospheric nitrogen deposition and soil type. An environmental driver file reflecting climate conditions anywhere on Earth can be created using the GetClim tool which accompanies LPJ-GUESS. A scenario of changing drivers relative to modern conditions can also be defined.

Settings for a particular model simulation are specified in the instruction file, containing settings such as the vegetation dynamics mode, disturbance interval, and the plant functional types (PFTs) to simulate. LPJ-GUESS Education comes with sample instruction files for cohort mode and the more simplified population mode.

This document will guide you through the six steps required to set up and perform your first simulation with LPJ-GUESS.

1

Start the LPJ-GUESS Windows Shell

The LPJ-GUESS Windows Shell provides a graphical user interface (GUI) for the LPJ-GUESS model. It is available on the desktop and in the LPJ-GUESS Education program group on the Windows Start menu.

2

Create a Workspace Folder

When you start the Shell for the first time, you will be prompted to create or choose a Workspace Folder. This is the default location where LPJ-GUESS expects to find the environmental driver file and instruction file for the model simulation. Output files from the simulation are written to the Workspace Folder. You may choose any location, provided you have permission to create and modify files there. You may change the Workspace Folder at any time by choosing Change workspace ... in the File menu.

3

Simulation Settings

Go to the Model menu and choose Run ... This brings up the Simulation Settings form.

4

Create an environmental driver file

On the Simulation Settings form, press the button labelled Run GetClim .... This launches GetClim, a tool for creating the environmental driver file required as input to LPJ-GUESS.

  • You may choose any location on the vegetated land surface of the Earth. In the field labelled Location, click on a location to simulate, or enter its longitude and latitude. You may also choose the assumed level of nitrogen deposition for your simulation.
  • In the field labelled Simulation protocol, specify the number of simulation years for the static (initialisation or spin up) and transient (scenario) phases of the simulation. The initialisation is the phase in which vegetation and soil ‘grow’ from bare ground to a state of equilibrium with the current climate, atmospheric CO2 concentration and N deposition level. How long the initialisation should be depends on whether the model will be run in cohort or population mode (see Step 5). For cohort mode with disturbances switched on, recommended length is five times the disturbance interval or at the most 1000 years. Further advice is available here. The scenario phase may typically be 100 years.
  • In the field labelled Output file to generate, check the proposed name and output folder for the environmental driver file. By default, the file will be written to the Workspace Folder. If you wish, you may enter another name or choose another output folder.

  • In the field labelled Input data, ensure that the option transient phase (Future Scenario mode) is checked. Information about the alternative Palaeo mode is available here. Click Enter anomalies to open the Anomalies window. Here you may specify what overall changes in temperature, precipitation and/or atmospheric CO2 concentration should occur over the scenario phase of the simulation. The changes that you specify are distributed evenly over the scenario period, and are relative to the modern-day baseline conditions of the transient simulation phase. Press OK to return to the main window of GetClim.

  • Press Generate file to create the environmental driver file. If you wish, you can open and examine the file in Excel (if available on the computer you are working on), or navigate to it in an Explorer window.

GetClim has a number of additional options and advanced features allowing different kinds of model experiments to be set up. More information about these options is available here.

5

Choose the instruction file

Decide whether you wish to run the model in cohort mode or population mode. Cohort mode is recommended. Sample instruction files for cohort and population modes should have been copied automatically to the Workspace Folder you selected in Step 2.

  • Go to the Instruction file field of the Simulation Settings form, press Browse ... and choose an instruction file for the simulation, either cohort.inz or population.inz (the ‘.inz’ part of the file name may not be visible, depending on your system settings).

  • In the event that the instruction files cohort.inz and population.inz have not been copied automatically to your Workspace Folder, you can find master copies in the LPJ-GUESS Education program group of the Windows Start menu. You may copy these manually to your Workspace Folder.

  • Pressing the View/edit ... button brings up an editor window in which you can review or make changes to the simulation settings if you should wish to. Don't forget to save the file (File|Save in the editor window’s own menu) after making any changes, or they will be ignored by the model.

6

Start the simulation

On the Simulation Settings form, press Run.

Results appear in real time both in the Simulation Log window and in special graph windows.

Additional results from the simulation are written to the output files whose names are specified in the instruction file. These files may be opened as tab-delimited text files in a spreadsheet program such as Excel. More information about file output is provided here. Available output variables are listed here.

In the event of any errors, these are reported in the Simulation log.

The simulation normally takes only a few seconds in population mode, but may take up to several minutes in cohort mode, depending on the speed of your computer’s processor and other factors. You can speed up the simulation by reducing the number of patches. You can terminate the simulation before it is finished, if you wish, by choosing Abort on the Model menu.